Posts

Read at your own risk...

Image
 So, it's been a while.  Lots of painting before this, but I'll fill in those posts as soon as I can get to them. This one is more important and could actually have some info that's useful for us 5.80 guys and gals. DISCLAIMER: This is a description of MY thought process and MY results.  Your results may vary.  Please don't copy my thoughts, designs, processes or mistakes without engaging your own brain and deciding if it will work for you.  I take no responsibility if your boat falls out of the sky into the water, onto the hard or onto someone's head.  I will disavow any knowledge of your sources or process if something bad happens.  This message will self destruct after reading. I'm working on an internal lifting harness.  They're really nice to have, and my boat will be dry stored on a trailer in a yard.  Our club requires an internal lifting harness, conceivably because people do dumb stuff with slings.   These things include ha...

Initial Weigh In...

Image
Well, hello there.  I've been dormant (again) for a bit, but I've finally got another quick post together. I didn't make Portugal, as you can tell by me posting right about now.  If I was in Portugal, I'd be slinging masts around, mounting stuff, loading the boat, and going for trial sails to get ready to depart on 31 October.  As my boat's not done and shipping containers into or out of the US right now is just plain not possible (LA port is full, 80 freighters offshore waiting to be offloaded, no containers to be had, shipping handlers/organizers have no idea of what problem to solve, how to solve it, or when it can be solved). As such, I'm just getting to weighing my constructed hull.  This is without any equipment; only required wood is included.  I turned up at (drum roll please...) That's kilograms, friends and neighbors.  The basically bare hull weighs about 1083 lbs.  With all of the equipment (batteries, mast, sails, paint, fairing, keel, life...

Welcome to the world, keel halves!

Image
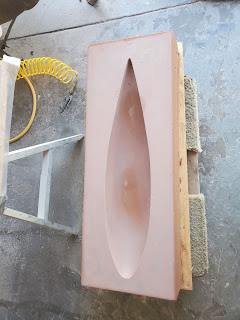
Okay, so it wasn't like giving birth.  But it's been a long time coming.  We really didn't know if it was going to be difficult, how it was going to be difficult, and how it could all go horribly wrong.  THAT'S just like kids, right? Caution: Long post.  This is one of the few subjects about building boats that I have some prior and pretty intimate knowledge of.  Read at the risk of extreme (hopefully not terminal) boredom. We needed to build the keel halves.  If you can find a big chunk of lead, you could conceiveably machine it.  Finding that chunk is hard, so you don't hear much about machining lead.  Mostly, since lead has a pretty low melting point, you hear about casting lead.  In bullets, in all kinds of non-load bearing weights, they're usually cast lead.  Since these bulbs/half bulbs will be bolted to a steel fin that will take the load of the keel bulbs, and the keel bulbs just have to keep themselves from falling apart, we'll ...

Moving Along

Image
Once all of the plywood skins are attached, there's a bunch of filling of cracks, gaps, and screw holes to do.  Then sanding, sanding, sanding in prep for fiberglass taping and putting down final fiberglass. Once the wood itself is rounded enough to allow fiberglass tape to comply with the curve, it's time to apply the fiberglass tape.  It's not all that hard.  Cut off an appropriate length of tape, trim it to allow it to go around corners where necessary.  Then put down some unthinned epoxy a little wider than the tape, and squish the tape into the epoxy.  Then use a little additional epoxy with a brush to secure the tape and squeeze the air bubbles out.  Rinse and repeat.  We got 300g/ m 2 tape with our kits, so we need to apply two layers.  The prints call for two layers of 600g/ m 2 tape (one layer of 100mm wide tape, and another layer of 150mm wide tape).  This means that we need two layers of 300 x 100mm tape, and two layers of 150mm ta...

Slinging Ply

Image
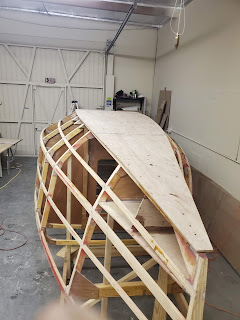
  Next up is epoxying and screwing down the plywood inner bottom.  It's not a complex process.  Put the plywood over the hull structure in the right spot, draw pencil lines around all of the stringers and ring frames. Predrill screw holes through the ply into all of the stringers and ring frames.  Remove the plywood to a bench. Brush full strength (unthickened) epoxy on the ply.  Then brush thickened epoxy on all of the touching stringers and ring frames.  Carefully replace the ply in the right spot, and start putting screws into stringers and ring frames.  Once it's fully screwed down, crawl under and wipe up all of the epoxy that squeezes out, either with a radiused tool or with a square corner.  The inner bottom is the easiest, so have fun. Now for the topsides of the hull.  It's also pretty easy.  It is kind of installing an in an "average" way, so that there's a minimum of material to remove, and there are no gaps to fill in.  ...

Frame Details

Image
Here is where it's good to spend some time thinking about how deck hardware gets placed and where backer plates should be.  The hardest to get to were going to be where the aft cleats are and where the running backstays are mounted.  It was easy to get to them before the rest of the ply was in, so I put them in now. I'll put some more up in the bow where the bow cleats will go, but those will be easy to get to once the deck is on, so I'll leave them for later.  I'll put some in where the daggerboards go as well.  As long as I put them in before the cockpit floor, seats, seat backs, and floor sides go in, they'll be easy too.

Skeg party

Image
 So, Hull 79  helped me out  shaping and glassing the skeg. Follow the link, and you can see how he shaped and glassed it. When the skeleton (the welded bolting arrangement for the skeg) was made, I made an aluminum bar with the proper spacing for the bolts.  I assembled the bolts into the bar with nuts.  Then the horizontal connecting bar was held against the bolt heads, and it was all welded together. When the skeleton was welded together, it was time to eposy it into the skeg.  I used the same aluminum bar to set it into the hollowed out skeg carefully and centered. Slightly funny, slightly scary story...  I mixed up lots of epoxy, with lots of thickener to fill the skeg and support the skeleton.  I was advised against doing it in one shot, but I tried anyway.  Not a good idea.  I placed the skeleton, poured in the epoxy and thought, "Great.  Job done."  Well, about 10 minutes later, I look over and the thing is smoking/offg...