Slinging Ply
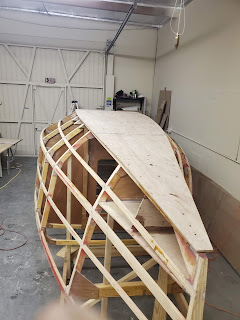
Next up is epoxying and screwing down the plywood inner bottom. It's not a complex process. Put the plywood over the hull structure in the right spot, draw pencil lines around all of the stringers and ring frames. Predrill screw holes through the ply into all of the stringers and ring frames. Remove the plywood to a bench. Brush full strength (unthickened) epoxy on the ply. Then brush thickened epoxy on all of the touching stringers and ring frames. Carefully replace the ply in the right spot, and start putting screws into stringers and ring frames. Once it's fully screwed down, crawl under and wipe up all of the epoxy that squeezes out, either with a radiused tool or with a square corner. The inner bottom is the easiest, so have fun.
Now for the topsides of the hull. It's also pretty easy. It is kind of installing an in an "average" way, so that there's a minimum of material to remove, and there are no gaps to fill in. Process is the same as the bottom. The top edges (facing down currently) will get cut and shaped appropriately when the boat is turned over and the cabin sides get installed.
Once the topsides are in place, the edges of the plywood bottom need to be shaped flat to the uncovered chine of the boat. Sanders, grinders, belt sanders...
Now, I had to make a decision about what to do with the "crash box". Do I seal it up and leave it empty? Do I put an inspection port into it? I finally decided to fill it up with styrofoam sheet (gathered from the trash, miscellaneous shipments, I'm not sure where it all came from) cut into approximately triangular shapes to fill up the space, and then it was time to put on the port chine. If I bang into something and break the crash box, I'll spread styrofoam beads all over the ocean, but at that point, I guess I'll have bigger problems. If I ever need to get in there in the future, I'll put in an inspection port.
The plywood chines fit along the bottom (currently facing up) of the plywood topsides, and flat to the shaped edges of the bottom. The edges of the plywood topsides had to be shaped some. Fit, sand, grind, fit, sand... The bow ends of the chines are absolutely tortured. They're bent, twisted, and otherwise screaming. You can see that I used fender washers and wood screws to pull the wood against the stringers and stem fitting for epoxying. Once the epoxy kicks, then I replaced the wood screws and fender washers with just wood screws. Otherwise, it's the same installation drill as the rest.
 |
| This is probably as important a picture as there is in this blog. We're trying to make the bottom sort of self-holding and the bottom of the chines self holding. Each should hold the other. |
Lastly, the bottom of the chines (currently facing up) need to be shaped flat to the horizontal inner bottom of the boat so that the outer bottom of the boat can be screwed down flat to the inner bottom. Both the outside of the inner bottom and the inside of the outer bottom should be coated with thin epoxy, and then coated with thickened epoxy (thin enough to flow, thick enough to not run like water). The outboard edges should be screwed to the stringers. There should also be real screws put into the ring frames and keel floors. Lastly, lots and lots of small wood screws (#6 or #8, 5/8" or 3/4" long) should be used in the "field" to screw the outer bottom to the inner bottom.
Whew. That's a lot of plywood.


Comments
Post a Comment