Hull construction begins (or, "What the hull?")
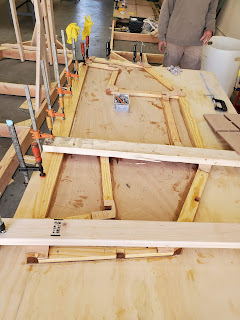
Here begins the construction of the hull. It starts with building the ring frames. These are the "annular" frames inside of the hull. We'll orient these properly on the strong back, connect them with stringers, and then plate the hull with big sheets of plywood.
So, the process is simple. I learned most of this from Hull 79. But first, let's start with a tool/supplies list.
- Cordless drill/impact driver
- Get a good one of each. It's really handy to have a drill bit loaded and impact phillips driver at the same time.
- Flat table
- Something large with legs. We made one by doubling up the lids on one of the crates and another with saw horse legs and a piece of 3/4" ply. Both work. Eight feet long is plenty, but a couple of the frames are over 48" wide, so scabbing a 6" wide piece on with a couple of 2x4s is good. The most important things are that your table is flat and convenient to work on. We had a low one too, but is was a little rough on the back. Don't use your best dinner table; it will be really convenient to screw things to the table. More on this later.
- Waxed paper
- We used some newspaper too, but the waxed paper keeps epoxy from spot welding your frame to the table top. Newspaper just makes it a little easier to remove. Waxed paper keeps it from sticking at all. You'll still have drips on the table, but these are easy to clean up.
- Clamps
- There are some bargain basement tool supply houses that sell the worlds cheapest C clamps. These work okay. The same place sells the worlds cheapest bar clamps. These don't work at all. Of course if you can buy all premium tools, by all means, do it. You'll use clamps to clamp rings to the table and keep things flat and in place. I suspect you'll use them a lot more when putting stringers on the ring frames.
- Stainless screws
- I did a lot of screwing corner plates to ring frame members. You'll fill these holes later. Minimize this if you can, but make sure that you get good corner joints between ring frame members and corner plates. This is the base of where the boat gets it's strength.
The basic process is to layout and place everything on the plywood (boat part or table), draw alignment lines for each member, disassemble, epoxy, secure in place, and wait.
Intermediate note-
Here, if you're really into fit and finish, it's worth mentioning that after laying out all of the parts and getting them placed well, consider doing your corner rounding before epoxying. You can get a router in places that are hard to get to after they're stuck together. If you're doing all of your shaping with sanders and/or sandpaper, it probably doesn't make much difference. I really hate sanding, so I did as much router work as I could, and not nearly as much as I should have.
When you're placing things in prep for epoxy, you need to be able to clamp them or screw them together to maintain alignment after epoxying.
There is a ton of detail in doing this well. The process for epoxy is to mix it up and brush it on all of the places that touch another place on the ring or on a corner plate. Give it a few minutes to soak in. Then thicken it with the proper thickening agent (not fairing filler, use a strong filler) a little (still pretty runny, but you want it to fill gaps) and coat all of the same places again. Start placing parts and securing them together (with stainless screws) and to the table, ensuring that some of the epoxy squirts out, ensuring that you have enough epoxy in there. If none squirts out after screwing or clamping, take it apart and do it again. Once it's all aligned, clamped and screwed down, go around with a gloved hand and brush and clean up any excess epoxy. leaving fillets where ever possible. The order is important- apply epoxy, clamp/screw together, and clean up. This is where I have the most trouble. I get all involved in doing the whole job at each joint and it just makes a big mess with epoxy on my hands, all over the drill and impact guns, all over the clamps and usually some in my hair.
Once the epoxy has dried, it's worth trying to remove as many screws as possible. I had a lot of heads break off. Some of the other builders had some success with using a soldering iron to heat up the screws before removing them. I didn't have much success with that method. I suspect that the problem was me (either my crappy soldering iron, or, more likely, impatience). In any case, removing as many screws as you can takes a bit of weight out. I also suspect that removing screws specifically in areas that get shaped in the future (bow knuckle, stem, etc.) will keep you from gouging chisels or hand planer blades.. A good friend suggested that waxing or oiling them before installing might work too. In the future where it's really important to get the screws out, I might try that.
Next is the cleanup for assembly. Your finish method will dictate how much sanding, cleaning an shaping you do.
In short:
- The more time you spend in alignment and setup, the happier you'll be.
- The time you spend in shaping and finishing before epoxying is worth it.
- Being clean and somewhat precise with the epoxy will avoid bad hairstyles.


Comments
Post a Comment